How to Choose a Platform for a Power Rack
Choose a power rack platform that supports the rack footprint, leaves room for your lifts, and matches your floor and noise needs. Measure the rack, bar path, plates, and surrounding clearance before choosing materials or thickness.
On this page (12 sections)
- What should a power rack platform do?
- How large should a power rack platform be?
- What should the base of a power rack platform be made from?
- How do you build a stable platform for a rack?
- Which flooring works around a power rack?
- How should rubber mats meet a wood platform?
- How can you control power rack noise?
- Should a platform support a bench too?
- How do you care for a power rack platform?
- What are the most common platform mistakes?
- What is the best power rack platform layout?
- Final decision: which power rack platform should you choose?
A power rack platform should support the rack, leave enough room for the barbell and plates, protect the floor, and stay stable during lifting. Start with measurements, then choose a firm base with rubber or crash protection where weights make contact.
A rack platform is more than a rectangle under the uprights. It is the working surface for the rack, the lifter and the barbell, so its size and construction affect stability, noise and daily use.
If you are still deciding whether mats belong under the rack, read Can You Put a Power Rack on Top of Mats?. The answer depends on mat thickness, rack stability, floor condition and how the rack is secured.
What should a power rack platform do?
A good platform should create a level, stable area for the rack while protecting the floor from repeated equipment contact. It should also give you enough room to stand, lift, load plates and put weights down without stepping off the protected surface.
The platform has four practical jobs:
- support the rack base
- provide a consistent lifting surface
- protect the floor from feet, plates and equipment
- reduce movement, vibration and noise where possible
These jobs can conflict. A very soft surface may feel cushioned but can allow rack feet to settle unevenly.
A hard wood surface may feel firm but can transmit more impact if plates are dropped directly onto it.
The best design usually separates the rack support area from the impact area. The rack needs a firm base.
The barbell landing zones need protection that can absorb some force without becoming unstable.
How is a power rack platform different from a squat rack platform?
A power rack platform usually needs more depth around the uprights because the rack has front and rear posts, safeties and a defined bar path. A squat rack platform can sometimes be smaller, but it still needs room for the lifter, barbell sleeves and plates.
Measure the actual rack rather than relying on a general platform size. Rack designs vary, and the listed width and depth may not include plate storage, feet, rear crossmembers or attachments.
A platform that fits only the front uprights may not protect the area where you step back for a squat. A platform that ends immediately behind the rack may also leave the rear posts partly on a different surface.
If you are comparing rack types before building the base, see What Is the Difference Between a Power Rack and a Half Rack?. The rack design changes how much platform area you need.
How large should a power rack platform be?
The platform should cover the rack footprint and the main lifting zone, with extra room for plates and normal movement. Measure the rack width and depth first, then add space for the barbell position and the places where weights may touch down.
Use these measurements:
- Measure the outside width of the rack feet.
- Measure the full depth from the front of the rack to the rear-most support.
- Mark the barbell position for squats, presses and pulls.
- Add room for plates on both sides of the bar.
- Mark where you stand during the main lifts.
- Extend the platform into the landing zones for controlled set-downs.
Do not measure only the rack uprights. Feet, rear supports, plate storage and attachments can extend beyond them.
A narrow platform may look tidy but create a sharp boundary beside the rack. That boundary can catch a foot, leave plates unprotected or force you to lift partly on one surface and partly on another.
A larger platform is not automatically safer. It takes more floor space and can make the room harder to use.
Choose the smallest size that covers the rack and the work area with useful margin.
How much clearance does a power rack platform need?
Leave enough clearance for the barbell, plates, your stance and safe movement around the rack. The exact amount depends on the rack, the exercises you perform and the room, so measure the complete setup rather than copying a universal number.
Check the following:
- space in front of the rack for the bar path
- room behind the rack if you step back or use rear attachments
- side clearance for loading plates
- ceiling height for the bar and pull-up work
- walking space around nearby benches or machines
- access to rack bolts, safeties and storage
A platform can make the rack area look finished while hiding a clearance problem. Mark the rack and barbell footprint on the floor with tape before buying materials.
Then perform the movements without a loaded bar. Step into position, unrack an imaginary bar, walk back if your program requires it, and return the bar to the rack.
This simple layout check can reveal a platform that is too short or too close to a wall.
What should the base of a power rack platform be made from?
A power rack platform needs a rigid, level base under the rack and a protective surface around the areas that receive foot and plate contact. Common approaches use plywood, rubber flooring or a combination of both.
Wood is useful when you need a firm surface for the rack feet. It can also create a defined platform with a level top when the floor underneath is sound and the layers are assembled carefully.
Rubber is useful where you want floor protection, grip and some impact control. Rubber can be used across the platform or placed in sections around a firmer center.
A mixed design often works well:
- rigid wood under the rack
- rubber on the lifting and plate areas
- thicker drop protection where weights may be lowered heavily
- a level transition between the surfaces
The surface should not rock, curl, separate or slide under normal use. A platform that moves can make the rack feel unstable even if the rack itself is well built.
For wood selection, read What Wood Should You Use for a Weightlifting Platform?. For the deadlift area specifically, see What Is the Best Wood for a Deadlift Platform?.
Should the rack stand on rubber or wood?
The rack can stand on rubber when the material is firm, level and stable enough for the rack feet. A softer mat may compress under concentrated loads, which can affect leveling or make the uprights feel less settled.
Wood gives the rack a firmer base, but bare wood does not provide the same cushioning as rubber. If plates are lowered or dropped on the wood, the floor and the platform receive more impact.
The right choice depends on the rack, the mat and the training style. Check the rack feet, floor condition and anchoring plan together instead of judging the surface by thickness alone.
If the rack manufacturer requires anchoring, follow those instructions. A platform does not make an unanchored rack safe for every exercise or load.
How do you build a stable platform for a rack?
Build stability from the floor upward. The floor should be clean and reasonably level, the platform layers should sit flat, and the rack should not bridge a gap or rest partly on a different height.
Before assembly:
- clear dust, grit and loose debris
- check for floor damage or soft spots
- measure the area twice
- confirm the platform will not block doors or vents
- plan access to rack bolts and floor anchors
- check the final surface height against nearby equipment
A small height difference can matter when a bench rolls from one surface to another. It can also create a trip edge at the platform boundary.
Use tight joints and keep the top surface flat. If you use interlocking mats, fit the edges fully and check that the pieces do not separate under foot traffic or equipment movement.
The platform should remain stable after the rack is loaded and unloaded. Recheck the joints, rack feet and surrounding mats after the first few sessions, especially if the surface was assembled rather than permanently fixed.
Should you anchor a power rack through the platform?
Anchoring depends on the rack design, the exercise plan and the installation instructions. A platform can distribute contact across the floor, but it does not automatically stop a rack from tipping or shifting.
If the rack requires anchors, plan them before covering the floor. You need to know where the rack feet sit, where fasteners pass through the platform and whether the floor can accept the required hardware.
Do not drill through a mat or wood layer without checking what is beneath it. Plumbing, wiring and other hidden obstructions can make drilling unsafe.
Anchoring also affects future changes. A rack bolted through a platform is harder to move than a freestanding setup.
Decide whether the room may need to change before fixing the layout permanently.
For a deeper explanation of rack frames and safety components, read How Do Power Racks and Their Safety Systems Work?.
Which flooring works around a power rack?
The best flooring around a power rack depends on the main risk you are managing. Use firm support for the rack, grippy protection for standing areas and thicker impact control where weights may contact the floor.
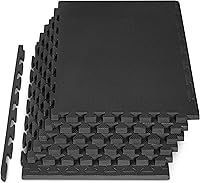
SUPERJARE 0.56'' Thick 48 Sq Ft Rubber
The SUPERJARE flooring covers 48 sq ft with 12 square tiles. Each tile is 24 x 24 in and 0.56 in thick, so the set can cover a wider area around a rack than a smaller flooring kit.
Its dual-layer construction combines a high-density EVA foam base with an EPDM rubber top. The rubber surface is designed to provide grip, while the foam layer is designed to cushion movement and reduce noise and vibration.
This layout suits a home gym where the rack shares space with kettlebells, a treadmill or other equipment. The interlocking edges let you assemble, detach or extend the arrangement as the room changes.
The trade-off is that the foam layer is not the same as a rigid structural platform. For a rack that needs a very firm, anchored base, use a suitable rigid section beneath the rack or confirm that the assembled floor stays level and stable.
The tiles have detachable borders for a square or rectangular finish. Wipe the surface with a damp cloth for routine care, and check the edges after moving equipment.
AIRHOP 0.56in Thick 24 Sq Ft Exercise
The AIRHOP set includes 6 square tiles, each 24 x 24 in and 0.56 in thick, for 24 sq ft of coverage. That footprint can suit a compact rack area, a bench zone or a smaller training corner.
The tiles combine a textured rubber top with a high-density EVA foam bottom. The rubber is intended to provide a non-slip surface, while the foam is intended to absorb shock and reduce noise and vibration.
The larger interlocking locks are designed to keep the tiles together during use. The pieces can be linked, detached or rearranged, which helps when you need to change the room layout.
The smaller coverage is the main trade-off compared with the SUPERJARE set. Six tiles may not cover the rack, bar path and plate zones at the same time, so measure the full working area before choosing this option.
AIRHOP describes the tiles for home gyms, garages, basements and workout rooms. Wipe them with a damp cloth and keep the edges fully joined before placing heavy equipment on top.
SEWD Weightlifting Crash Pad
The SEWD Weightlifting Crash Pad is a set of 2 pads with sturdy high-density foam and a PVC leather cover. Each pad has a carry handle, so you can move the pair between training areas or store them after use.
These pads solve a different problem from interlocking floor tiles. They are intended for the impact zone beneath dropped barbells and free weights, where reducing rebound and noise matters more than covering the whole room.
The pads can also be stacked for plyometrics, hip thrusts, core work and an aerobic step platform. Those uses make them more flexible than a fixed floor layer, but they do not replace a full platform under the rack.
Use them with a stable rack and a suitable floor surface. Place them where the weights land, keep the edges clear and inspect the cover and foam after repeated heavy use.
The package dimensions are 20.5 x 20.5 x 10.8 in, and the package weight is 4.97 kg. The product has a 100-day warranty description, but that does not remove the need to check the current terms before buying.
How should rubber mats meet a wood platform?
Rubber mats should meet the wood platform with a flat, secure transition that does not create a raised edge or loose seam. The goal is to keep the rack level while giving your feet and plates a consistent surface.
Avoid overlapping mats at the platform edge. An overlap can create a lip that catches shoes, bench wheels or plates.
Check the transition after placing the rack and bench. Equipment weight can compress a cushioned mat and make a previously level seam change height.
If the edge keeps moving, review the entire layout. The problem may come from an uneven floor, a mat that is too soft, an undersized platform or equipment sitting partly on one surface.
Keep the rack feet on the surface intended to support them. If one foot sits on wood and another sits on a soft mat, the rack may not feel level even when the room floor is flat.
How can you control power rack noise?
Control noise by preventing movement, cushioning impact and keeping the rack and platform stable. Rubber flooring can reduce some vibration, while crash pads help with direct barbell contact.
Noise usually comes from more than one source:
- plates touching the floor
- a barbell rebounding after contact
- rack bolts, safeties or J-cups moving
- plates rattling on the bar
- a bench or storage unit sliding
- vibration passing through a hard or hollow floor
Start with the rack itself. Tighten the approved hardware, check that the feet sit flat and make sure the safeties are properly positioned.
Then address the floor. Put protective material under the places where plates or equipment make contact, and leave enough room that you do not need to set weights partly on bare flooring.
A cushioned tile may reduce some vibration, but it cannot eliminate the sound of a barbell hitting a hard surface. Crash pads are more targeted when controlled drops are part of the training plan.
For a broader look at floor surfaces and equipment movement, read How Do Gym Flooring and Equipment Handling Affect Noise and Stability?.
Should a platform support a bench too?
A platform can support a bench when it leaves enough room for the bench base, the lifter and the bar path. Check that the bench does not sit across a height change or roll into an interlocking seam.
Measure the bench footprint with the rack. A bench that fits inside the rack may still extend beyond the platform when you move it for incline or flat work.
The bench should not wobble as you press or unrack the bar. If the platform compresses unevenly under the bench feet, move the bench to a firmer section or reassess the surface design.
Keep enough room to carry the bench out of the rack. A platform that traps the bench between the uprights and a wall can make routine changes frustrating and unsafe.
A functional trainer may need a different layout because its cable paths and user positions extend beyond a rack footprint. If you are deciding between setups, read Functional Trainer vs Power Rack: Which Should You Choose?.
How do you care for a power rack platform?
Care for the platform by keeping it clean, checking movement and inspecting the rack contact points. Small problems are easier to correct before they become a clearance, stability or floor-damage issue.
Use a damp cloth for routine cleaning when the flooring instructions call for it. Remove grit that could work into mat seams or scratch the floor beneath the platform.
Check these areas regularly:
- tile edges and interlocking teeth
- seams between rubber and wood
- rack feet and anchors
- surface dips under concentrated loads
- crash-pad covers and handles
- loose plates or equipment near the platform edge
Do not trap moisture beneath mats. If you clean the floor, allow the surfaces to dry before placing the platform back in position.
Move heavy equipment carefully. Dragging a rack, bench or loaded storage unit can pull mats apart and damage the floor.
Recheck the room after changing equipment. A platform designed for a rack alone may not remain suitable after adding plate storage, a cable attachment or a larger bench.
What are the most common platform mistakes?
The most common mistakes are measuring only the rack, choosing a soft base without checking stability, and ignoring the barbell landing area. Each mistake can leave the floor protected in one place while the actual training area remains exposed.
Avoid these errors:
Building only under the uprights
The rack feet need support, but the lifter and plates need space too. Extend the platform into the stance and set-down areas.
Choosing by thickness alone
A thicker mat is not automatically a better rack base. Material, firmness, seams and the load pattern all affect stability.
Forgetting the full bar length
The rack may fit the room while the loaded bar does not. Check plate clearance at both ends and leave room to load the sleeves.
Blocking access
Do not place the platform so close to a wall that you cannot adjust safeties, tighten hardware or move the bench.
Treating mats as anchors
Flooring can improve grip and protect the surface, but it does not replace required rack anchoring.
Mixing uneven heights
A wood section beside a thick foam mat can create a step. Make the transition flat or redesign the layout.
Ignoring the floor below
A platform can hide moisture, cracks or an uneven surface. Inspect the floor before covering it.
What is the best power rack platform layout?
The best layout puts the rack on a stable, level base and extends protection into the barbell, stance and plate zones. Use rubber for grip and floor protection, then add targeted crash pads where impact is most likely.
Choose a larger interlocking floor area when:
- the rack shares space with other equipment
- you need protection around the bench
- the room has a broad open training zone
- you want a movable layout
- noise and vibration affect nearby rooms
Choose a smaller floor kit when:
- the rack area is compact
- the bar path is already mapped
- you can protect the landing areas separately
- the room has limited floor space
- you plan to use a rigid center platform
Choose crash pads when:
- direct barbell impact is the main concern
- you need portable protection
- weights may be lowered outside the rack area
- you want to reduce rebound
- you need pads that can support several general exercises
A rack platform should fit the way you train today while leaving a sensible path for future changes. Do not buy a surface based only on the rack's listed width and depth.
Final decision: which power rack platform should you choose?
Choose a power rack platform with a firm rack base and protected lifting zones. Measure the rack, bench, barbell and plate positions first, then select a surface that stays level and gives the floor enough protection.
Choose the SUPERJARE set when you need 48 sq ft of 0.56 in thick interlocking rubber-top flooring around a larger home gym area. Choose AIRHOP when 24 sq ft of the same stated thickness suits a smaller rack zone.
Choose the SEWD crash pads when your main concern is reducing noise, vibration and rebound from weights contacting the floor. They work as targeted impact protection, not as a complete rack platform.
If you are still deciding what to place under the rack, compare the platform size with your full lifting area, not just the uprights. A stable rack, clear bar path and protected landing zone matter more than a platform that simply looks finished.
Frequently asked questions
What size should a power rack platform be?
Make the platform wide and deep enough for the rack footprint, the barbell, your plates and the lifting position. A platform that only fits the rack legs may leave the plates on an unprotected floor.
Measure the full working area before cutting wood or laying mats.
Can a power rack sit directly on a platform?
A power rack can sit on a properly built platform when the base is level, stable and strong enough for the rack and training loads. Secure the rack according to its instructions, and keep the platform from rocking, sliding or separating at its joints.
Is a wood platform better than rubber mats for a power rack?
Wood and rubber solve different parts of the problem. Wood can provide a firm, level base for a rack, while rubber helps protect the floor and reduce impact noise.
Many home gyms combine a rigid center with rubber areas where weights are set down.
Do I need a platform under a squat rack?
You need a suitable base under a squat rack when the floor is uneven, vulnerable to damage, slippery or unable to manage repeated loading. A platform can also define the rack area, but it should not replace proper rack anchoring or safe clearance.
How do I reduce noise around a power rack?
Reduce noise by controlling impact at the source, keeping the rack stable, and using suitable rubber or crash pads where weights contact the floor. A cushioned surface can reduce vibration, but it cannot fix a loose rack, a hollow floor or poor lifting technique.