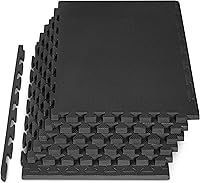
How Do You Protect a Wood Floor Under Exercise Equipment?
On this page (13 sections)
- What Matters Most at a Glance
- Understand the Question Before Measuring
- Five Checks to Complete
- How to Test the Setup Step by Step
- Measurements and Specifications to Record
- Common Mistakes to Avoid
- How the Answer Changes in Different Rooms
- Safety and Compatibility Boundary
- A Simple Pre-use Checklist
- Before You Buy or Modify Anything
- The Bottom Line
- Frequently Asked Questions
- Sources and Further Reading
Quick answer: Protect wood flooring with a clean, compatible barrier that spreads loads, resists movement, and does not trap moisture or react with the finish. The surface must remain firm and level beneath benches, racks, and machines.
Use the exact manual for your equipment and get qualified help whenever structural support, anchoring, electrical work, or building rules are uncertain.
How Do You Protect a Wood Floor Under Exercise Equipment is a practical planning question, not something to solve from a single product dimension. The useful answer comes from comparing the equipment, room, user movement, and manufacturer instructions as one system.
This guide explains what to measure, how to test the idea before committing, and which common shortcuts can create an unstable or frustrating setup.
What Matters Most at a Glance
| Planning layer | What to examine | Why it matters |
|---|---|---|
| Surface | Material, finish, flatness, moisture | Determines compatibility |
| Load | Feet, wheels, impact, stored weight | Shows how force reaches the floor |
| Movement | Compression, seams, edge lift | Affects stability and tripping risk |
| Maintenance | Cleaning and inspection access | Protects both layers over time |
Start with the limiting condition. The tightest clearance, softest surface, least compatible connection, or most restricted access point normally determines whether a setup works.
Understand the Question Before Measuring
Protect wood flooring with a clean, compatible barrier that spreads loads, resists movement, and does not trap moisture or react with the finish. The surface must remain firm and level beneath benches, racks, and machines.
A measurement is useful only when it matches the way the equipment is assembled and used. Record the normal position and every temporary position created by loading, adjusting, folding, moving, or servicing it.
Practical rule: If the plan works only when another item is moved first, treat that dependency as part of the layout. Test it deliberately rather than hoping the room will feel larger after installation.
Five Checks to Complete
- Confirm the floor finish is fully cured before covering it.
- Use materials approved for direct contact with wood.
- Distribute concentrated feet when the equipment maker permits it.
- Prevent grit from becoming trapped and acting like sandpaper.
- Inspect for condensation, staining, dents, and movement.
Write these observations on the floor plan. A phone photo is useful, but a dimensioned sketch makes conflicts easier to compare and gives you something concrete to check against the current product manual.
How to Test the Setup Step by Step
- Clear and inspect the area. Remove loose objects, clean the surface, and identify permanent obstacles.
- Measure more than once. Check at the floor, equipment height, and the highest or widest moving position.
- Mark the real envelope. Use painter’s tape or cardboard for the resting footprint and a second boundary for operation.
- Rehearse normal use. Walk the approach, imitate adjustments, and carry an unloaded plate or accessory through the planned path.
- Check the manual. Compare the test with assembly, anchoring, clearance, surface, and maintenance instructions.
Repeat the test with nearby doors open, benches extended, and other equipment in its normal position. A setup should remain workable on an ordinary training day, not only when the room is empty.
Measurements and Specifications to Record
Create one worksheet for the room and one for the equipment. Record dimensions in the same unit so small metric and imperial differences do not disappear during conversion.
- Overall width, depth, height, and the lowest overhead obstruction
- Foot, base, post, pin, hole, or edge dimensions relevant to contact and fit
- Clearance for the user, moving parts, adjustments, and loading
- Surface condition, level changes, seams, moisture, and transitions
- Delivery, assembly, inspection, and service access
Common Mistakes to Avoid
- Choosing by thickness alone
- Using a soft surface beneath narrow equipment feet
- Covering moisture or dirt without inspection
- Ignoring edges, seams, and transitions
- Assuming any rubber product is compatible with every floor finish
These mistakes often remain hidden while equipment is unloaded. Test with conservative assumptions and follow the stated limits instead of using body weight or stored weight as proof that a setup is secure.
How the Answer Changes in Different Rooms
Garage
Include vehicle position, garage-door travel, sloped floors, temperature changes, moisture, and wall or ceiling hardware. Keep the route between the home and exterior clear.
Basement
Measure stairways, landings, beams, pipes, drains, and the delivery turn. Investigate moisture and seek qualified advice when concentrated loads or anchoring raise structural questions.
Spare Room
Protect the finished floor, limit transmitted vibration, and keep the exit usable. A compact selection of well-spaced equipment is usually more practical than overlapping working zones.
Safety and Compatibility Boundary
Do not drill, cut, bend, shim, anchor, or combine components merely because they appear close in size. Safety parts need confirmed compatibility, and structural work should follow the manufacturer’s instructions and applicable building requirements.
Stop using equipment that rocks, shifts, binds, has damaged hardware, or no longer holds an adjustment securely. Correct the cause before adding load.
A Simple Pre-use Checklist
- The room and equipment dimensions match the current plan
- Exits, utilities, cords, and service points remain accessible
- The base is firm, level, clean, and compatible with the equipment
- Moving parts and the user stay inside the tested working zone
- Fasteners, pins, safeties, seams, and contact points are inspected
- The setup follows the current manufacturer instructions
Before You Buy or Modify Anything
Save the product page, current manual, compatibility chart, and your measurements in one place. Product names can remain similar while dimensions or included hardware change. Confirm the exact model and revision you will receive.
When comparing options, give more weight to a setup that is easy to enter, adjust, inspect, and maintain. A slightly smaller system that works without awkward workarounds is often more useful than a larger one that consumes every remaining inch. Revisit the taped layout after a normal workout routine so the decision reflects real movement rather than an empty-room impression.
The Bottom Line
Protect wood flooring with a clean, compatible barrier that spreads loads, resists movement, and does not trap moisture or react with the finish. The surface must remain firm and level beneath benches, racks, and machines.
The safest decision comes from measuring the real operating condition, testing it before installation, and treating the manual—not a rounded product label—as the final authority.
Frequently Asked Questions
Can one general clearance number answer this question?
No. Product geometry, attachments, the user, and the room all change the required space. Use the exact product manual and a physical layout test.
Is the assembled footprint enough for planning?
Usually not. Add operating, loading, adjustment, inspection, delivery, and assembly zones.
Should movable equipment count in the plan?
Yes. Show where benches, plates, handles, mats, and accessories sit during use and storage.
When is professional help appropriate?
Get qualified help for uncertain structural capacity, anchoring, electrical work, wall construction, moisture, or code requirements.
How often should the setup be checked?
Inspect it before use and after movement, installation changes, unusual impact, or any sign of loosening, rocking, seam movement, or surface damage.